Form workspace
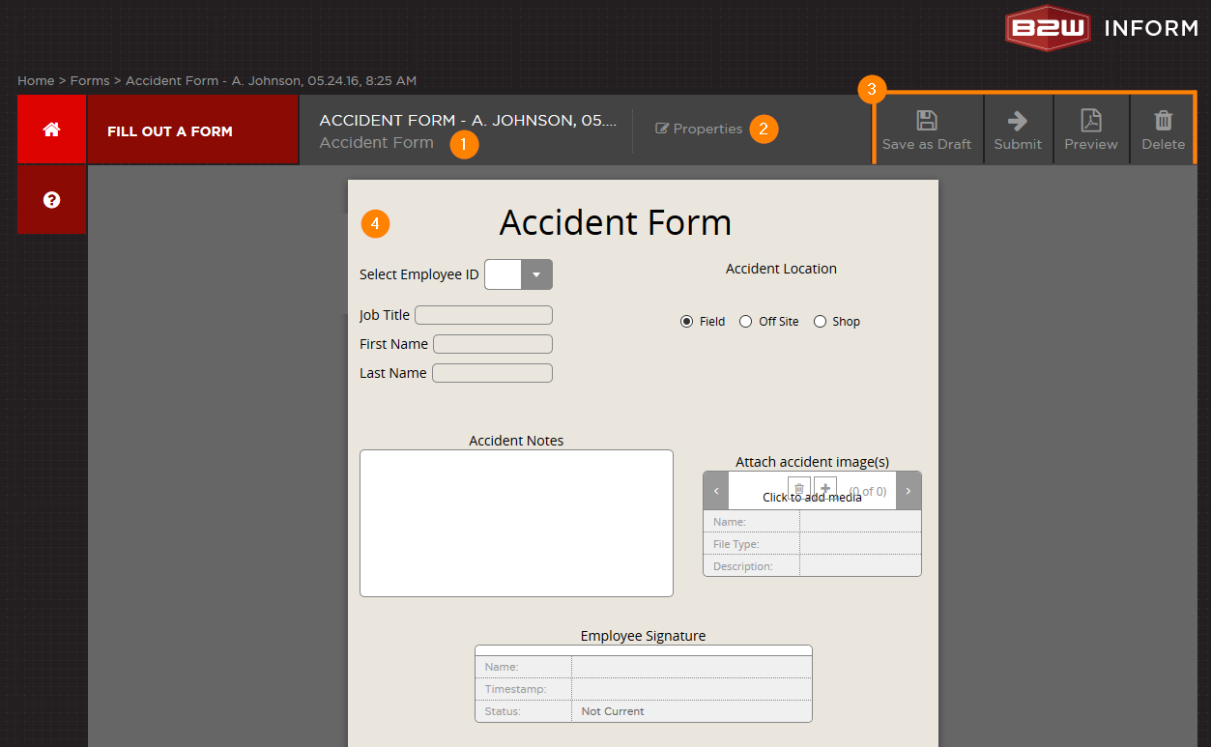
The following image outlines the main areas and sections you will see when filling out a form. The numbers on the image correspond with the numbered sections below the image that explain a specific area of the form page in detail.

Corresponding form areas and actions
1. Form name
When you open a form to fill out, the default name the system gives your form will include:
- The name the form was given by its creator (the name of the form in the system)
- The first initial and last name of the user filling out the form
- Date and time the form was started
Example default form name: Job Site Safety Review - A. Parker, 04.10.17, 8:44 AM
The form name listed in this section is also listed in the breadcrumb navigation at the top of the Fill Out a Form page. You can change the name at anytime by clicking Properties at the top of the page and editing the Form Name field.
Note: If you are working on a reduced-browser size, this information will be listed with a ellipses (...). To view all the information listed here when working with a reduced-browser size, hover your cursor over the form name and the rest of the information will display.
2. Form properties
Click Properties in the Forms Toolbar to open the Form Properties box manage the information about the form you are filling out. You can edit these properties at anytime when filling out your form. The Form Properties box also appears when you open a form for the first time. If the form you selected to fill out requires approvers, you will see the Approval Sequence tab in this box too, where you can select form approvers.
3. Form actions
The Forms Toolbar includes actions for your selected form. Form actions include:
- Save as Draft – Saves the form as a draft. You can access this form again in the Drafts tab of the Forms area.
- Submit – If your form requires approval, you will see this action. If you have not selected approvers before clicking Submit, the Approval Request box will appear prompting you to select at least one approver. Your submitted form will be accessible from the Pending tab in the Forms area until it is rejected or approved.
- Complete – If your form does not require approval, you will see this action. After you click Complete your form will be available in the Completed tab of the Forms area.
- Preview – Provides a browser preview of your form. On this page you will have the option to download a PDF version of the form. This action is also available after submitting/completing a form.
 Browser settings for PDFs
Google Chrome
- Open Chrome.
- Click on the three vertical dots icon to open the Customize and control Google Chrome menu.
- Click on Settings.
- Click on Show advanced settings.
- Click on the Content settings button.
- Locate PDF Documents and check the option Open PDF files in the default PDF viewer application.
Firefox
- Open Firefox.
- Click on the hamburger icon to open the Menu.
- Click on Options.
- Click on Applications from the sidebar menu.
- In the Applications table, select Portable Document Format (PDF) and select the action Always ask.
- Email – Use this action to send your form to users from the B2W Inform system and/or external users. This action is also available after submitting/completing a form.
- Delete – Deletes the form you are currently filling out.
After clicking Submit the following actions appear depending on your role:
- Recall – If you have submitted your form, you have the option to recall the form if needed. Changes the form status from Pending to Draft.
- History – Once you have submitted or completed your form, you can view form history. Form history includes, any actions (including rejection or approval comments), taken on the form.
- Reject – If you are a form approver, use this action to reject the form. You will have the option of adding comments as to why you rejected the form. The form status will change from Pending to Rejected.
- Approve – If you are a form approver, use this action to approve the form. You will have the option of adding comments as to why you approved the form. The form status will change from Pending to Approved.
4. Form
This is an example of a form ready to fill out. To begin filing out a form, click a component on the form and select or enter information into the field.
PDF Appendix
After generating a PDF, all applicable media, file attachments, and form history will be placed in an appendix on a new page at the end of the PDF. The appendix is included in the PDF Preview.