Creating New Alerts
Alerts notify users of actions to be performed after specific criteria is met. For example, an Alert might be configured to send an email to certain Users when a Form is created with a certain value in a certain Component.
This page provides an overview of the Create New Alert and Edit Alert pages, including:
Creating Alerts
You can create a completely new alert or copy an existing alert that has similar criteria to save time.
- To setup a new alert, click Create New Alert on the Alerts home page.
- To copy an existing alert, click Copy in the Action column next to the alert you want to copy on the Alerts home page.
- To edit an existing alert, click Edit in the Action column next to the alert you want to edit on the Alerts home page.
Overview of steps 1-4 on the Create New Alert and Edit Alert pages
STEP 1: Enter Alert Name
- Name – Enter a unique name for your alert. This will be the subject of your email and text notifications. Make sure your name is clear and concise so the receiver knows what they are being notified about.
Note: Alert names are limited to 70 characters.
STEP 2: Configure Alert Criteria
- Template – Select a template from the menu to configure alerts for.
Using the alert expression builder, add and configure the criteria for your alert using components and form-related data.
The following components, when part of the template, will be listed as choices in the expression builder:
- Auto Populate
- Check Box
- Check List
- Computed
- Currency
- Date/Time
- Dropdown
- Numeric
- Phone
- Radio Buttons
- Text Box
- URL
The following form-related data will be listed as choices in the expression builder for all alerts:
- Completed On/Submitted On
- *Form State — This option is only for templates that support the approve/reject workflow.
- Group
- Owner
- Sub-group
Add additional alert criteria
To add additional rules/groups to your alert, click Add Rule or Add Group on the expression builder.
STEP 3: Add Alert Recipients
You can select users and/or user groups for alert recipients.
- Users/User Groups – Select one or more users or user groups by clicking the Users/ User Groups field and selecting a user or user group from the menu. Once you click into these fields, you can also type to find the user or user group you want to add. The list filters as you type.
Then click Add. Added users and groups will display in the Selected Recipients section.
- External Recipients – You can add recipients from outside your database and organization. Just enter a name and email or phone number and click Add. External recipients will also display in the Selected Recipients section. The phone and email fields are validated.
- Phone number format: (123) 123-1234.
- Email format: name@emailaddress.com.
- Selected Recipients – In this section, choose which users will receive email and SMS notifications by selecting the check box next to the user/user group for email and/or SMS text notifications.
To select the same notification type for all the users and/or user groups added to the Selected Recipient section, select the top check boxes in the email and SMS text columns:  .
.
Remove Recipient(s)
- Select the Remove check box next to a recipient and click Remove.
- Select the top Remove check box and click Remove to remove all recipients.
STEP 4: Enter Notification Texts
Enter custom text for your notifications. You can also preview what the notification will look like when it is sent to a user. Once you are finished, click Save. The text field can be resized by dragging the bottom, right-hand corner of the field.
Preview Notification
- Select Click here to preview a sample notification at the bottom of the text box.
Include Form PDF in Email Notifications
- Select this check box to include a PDF attachment of a form in email notifications, so users can view the form that triggered the alert. This option is unchecked by default.
Example: Configure an alert
You have an accident template you want to configure alerts for. This accident template is for employees to fill out when an accident occurs with an injury in your business unit named "GCA". Here are the steps you can take to setup and configure your alert:
- Name your alert. For example, you could name the alert, "Accident Occurred with Injury (GCA BU)". Giving your alert a specific name will help those who are being notified understand exactly what they are being notified about.
- Select the template you want to associate with this alert. In this example, it is called, "Accident Form".
- Configure your custom alert criteria for this form using the expression builder. For this example, there are 3 criteria we want this form to notify recipients by:
- If the business unit selected in the form is "GCA" from the Business Unit dropdown component.
- If the "Yes" radio button is selected in the "Was there an injury?" question on the form.
- If a type of injury is selected within the Injury Type check list component on the form.
In other words, you want recipients of this alert to be notified anytime any of the above criteria is true when a user submits this form. Now let's setup each alert criteria.
-
 Configure alert criteria – anytime GCA business unit is selected
- Select BusinessUnit from the first field of the expression builder. This will allow you to configure alerts for a business unit.
- From the middle field select Contains. This tells the expression builder, that whatever business unit the last field contains, you want to send a notification to the selected recipients.
- In the last field select GCA, because you are configuring alert criteria for your GCA business unit.
If your alert is configured correctly, it will appear as the following:

-
Configure Alert Criteria – anytime an injury occurs
- Click Add Rule. This will add another set of fields so we can configure our alert to trigger a notification anytime a user selects the "Yes" radio button in the "Was there an injury?" question on the form.
- In the first field select, Wasthereaninjury. This tells the expression builder you want to notify a user based on this specific radio button component in the form.
- In the second field select, Equals.
- In the third field select, Yes.
Now the expression builder should appear as the following. with two criteria configured:

-
Configure alert criteria – when any type of injury is selected
Now it's time to configure the last of the alert criteria in the expression builder.
- Click Add Rule to add another set of fields where you can configure your alert to trigger a notification anytime a user selects an injury type from the Injury Type check list component on the form.
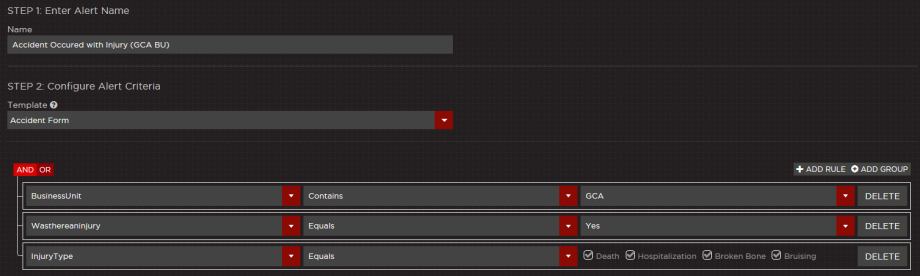
- In the first field select, InjuryType.
- In the second field select, Equals. This tells the expression builder that anytime the third field equals one of the options selected, a notification must be sent.
- In the third field, select which Injury Type options from the check list component you want to include in the alert. In this example, let's check all of the options.
Now with all 3 criteria configured, your alert should display as the following: